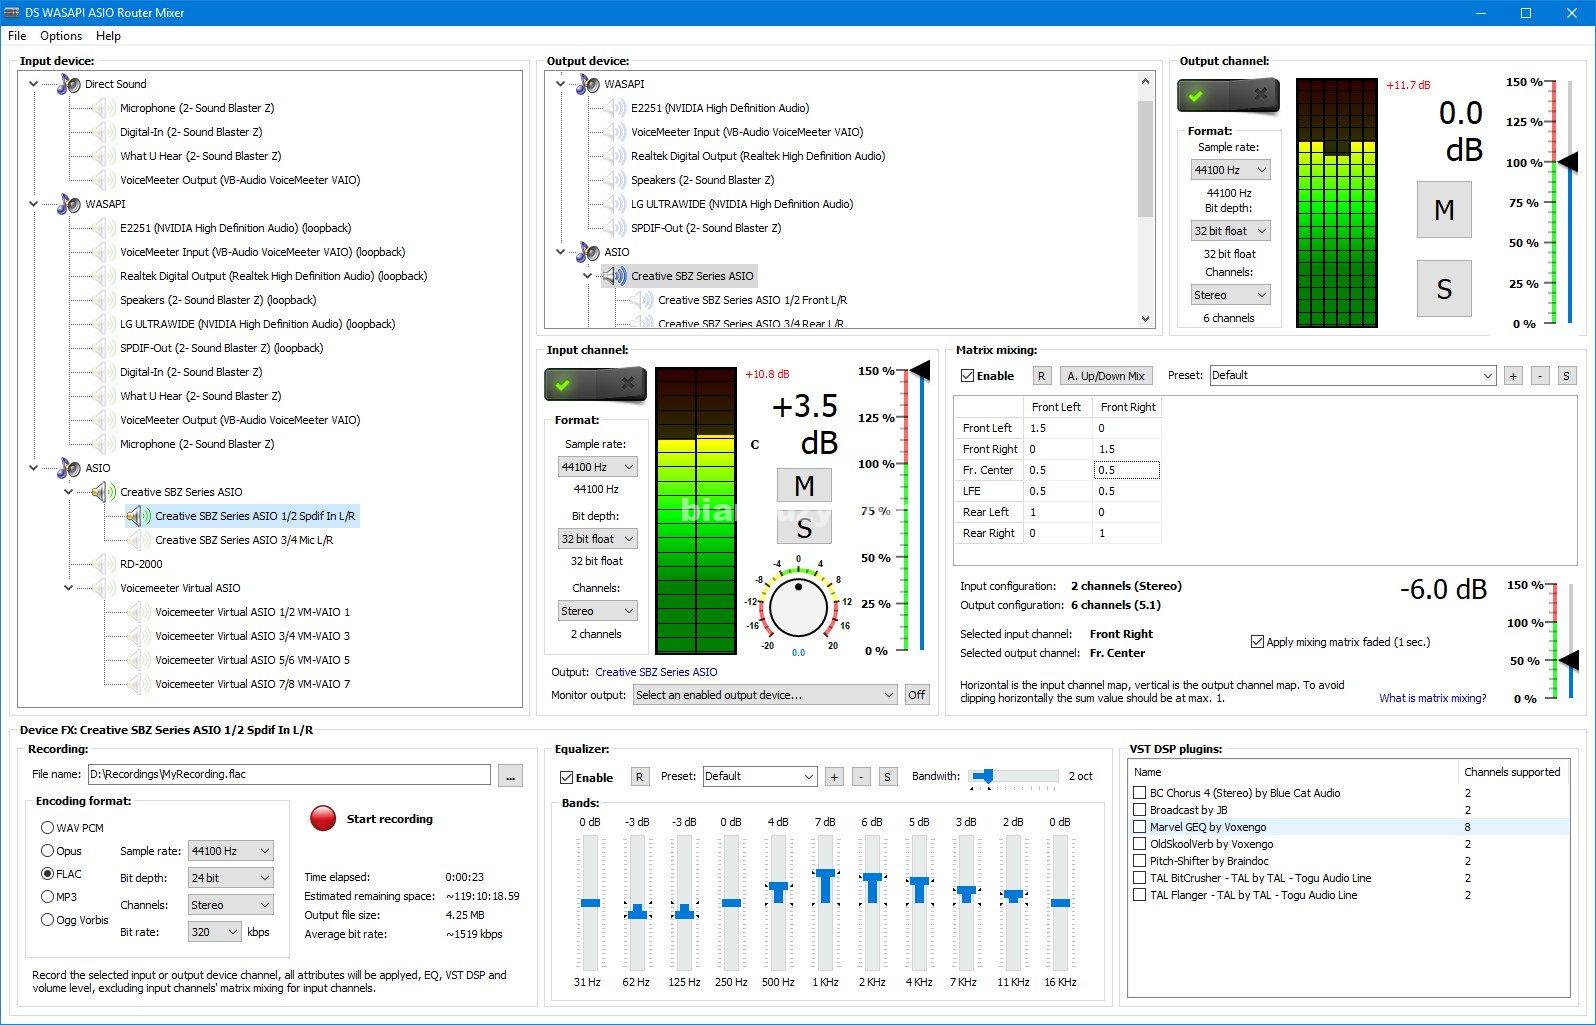
DS WASAPI ASIO路由器混频器是一个音频输入音频输出路由器/混频器,支持直接声音,WASAPI和ASIO模式。任何类型和数量的音频输入可以路由到任何类型的音频输出与矩阵混合,VST DSP插件支持,11波段均衡器和录音选项。ASIO输出混频器是可选的多线程,以实现高分辨率96/192KHz输出与dsp的最低可能的延迟。均衡器、矩阵混合和VST dsp都有一个预设系统来存储和回收设置。
使用DS WASAPI ASIO路由器混合器的基本步骤:
在窗口的中上方选择一个输出设备。在右边设置所需的格式,然后单击“启用”开关。ASIO通道对继承根设备的参数,所以如果需要的话,首先设置根参数。
在窗口的左边选择一个输入设备。在右边(整个窗口的中间)选择所需的输入格式,然后单击“启用”开关。所选的输入设备将在先前所选的输出设备上开始播放。输入设备总是通过最后选择的输出设备启用。它是可能的eXes在底部选择一个输入或输出设备从列表。最后选择的输入或输出设备将受到影响。下面面板的groupbox标题显示当前选择的设备的名称(输入ot输出)。
例如,要将均衡器应用到设备上,请设置EQ跟踪条并单击“启用”。当然,参数也可以动态更改。
ASIO通道对从根设备接收音频数据,因此在根设备上设置任何效果,如音量或EQ, VST DSP,将影响所有的通道对。注意,大多数VST DSP插件只支持立体声,所以其他然后1/2通道可能不受影响或静音,在这种情况下设置VST DSP对通道。
提示:
输入和输出通道/设备的“格式”设置可能没有效果。对于WASAPI和根ASIO设备的通道计数,情况总是如此。输入和输出ASIO设备将始终有最大数量的通道支持,ASIO对通道将始终立体声。启用设备/通道后,实际格式将显示在设置选项下面。要设置WASAPI设备的格式,请使用Windows音频设备控制面板。
ASIO:如果输出跳过,增加ASIO设备的缓冲区大小。通过启用设备,然后右键单击设备名称并选择“ASIO控制面板…”,可以访问ASIO设备的配置窗口。更改设置后,可能需要重新启动DS WASAPI ASIO路由器混频器。如果你的计算机的CPU有节电功能(CPU是动态时空闲)调整CPU的节电选项在Windows控制面板50%或更高,如果输出仍然跳过。鼠标中键点击输入/输出峰值数可以节省一点CPU时间。这将禁用峰值计算过程。最快的CPU(截至2019年4月)是英特尔Core i9-9900K,为应用程序提供3.60GHz的处理器。对于ASIO输出,如果在设置中启用了多线程处理,那么拥有更多核心的CPU是最优的,此功能是实验性的,只有在ASIO通道很多且通道上有很多像VST dsp这样的效果时才具有优势。
打开插件的配置窗口,双击插件的名称。要重置插件的设置,右键点击插件的名字,从菜单中选择“重置插件为默认值(禁用)”。
在处理输入和输出通道/设备时,建议始终以32位浮点采样格式模式工作。记录可以设置为任何所需的格式,样本数据将转换为设置的格式进行记录。
ASIO根设备记录:可以只记录启用的立体声通道对选项来记录ASIO根设备。对于“通道”选择“活动通道对”,只有活动通道对将被记录。例如,如果ASIO对1/2和5/6被启用,录音将包含4个频道:1/2和5/6。注意,多通道记录只支持WAV PCM, Opus, FLAC和Ogg Vorbis格式。
什么新:
更新:官方网站不提供任何关于这个版本变化的信息
主页
https://www.3delite.hu/
DS WASAPI ASIO Router Mixer is an audio input to audio output router/mixer with support of Direct Sound, WASAPI and ASIO modes. Any type and number of audio inputs can be routed to any type of audio output with matrix mixing, VST DSP plugin support, 11 band equalizer and recording option. ASIO output mixer is optionally multi-threaded to achieve lowest possible latency for high resolution 96/192KHz output with DSPs as well. Equalizer, matrix mixing and VST DSPs have a preset system to store and recall settings.
Basic steps for using DS WASAPI ASIO Router Mixer:
In the upper-center part of the window select an output device. To the right set the desired format and click the ‘Enable’ switch. ASIO channel pairs inherit the root device’s parameters so set the root parameters first if needed for the pairs.
In the left part of the window select an input device. To the right (center of the entire window) select the input’s desired format and click the ‘Enable’ switch. The selected input device will start playing on the previously selected output device. The input device is always enabled through the last selected output device. It’s possible to enable multiple input devices for 1 output device, but only 1 output is supported for an input device, but in the input device options panel it’s possible (at the bottom) to specify another ‘monitor’ output device, that needs to be enabled previously, that will play the selected input device too.
To access the 3 FXes on the bottom select an input or output device from the list. The last selected input or output device will be affected. The lower panel’s groupbox caption displays the currently selected device’s name (input ot output).
For example to apply an equalizer to the device, set the EQ track bars and click on ‘Enable’. Of course the parameters can be changed on the fly too.
ASIO channel pairs receive audio data from the root device, so setting any effect, like volume or EQ, VST DSP, on the root device will affect all the channel pairs. Note that most VST DSP plugins support only stereo, so other then 1/2 channel might be unaffected or muted, in this case set the VST DSPs on the channel pairs.
Hints:
Input and output channel/device ‘format’ settings may have no effect. This is always so with WASAPI and with root ASIO devices’ channel count. Input and output ASIO devices will always have the maximum number of channels supported, ASIO pair channels will be always stereo. After enabling the device/channel the actual format is displayed below the set option. To set WASAPI devices’ formats, please use the Windows audio devices control panel.
ASIO: if the output is skipping increase the ASIO device’s buffer size. It’s possible to access the ASIO device’s configuration window by enabling the device then right mouse clicking on the device name and selecting ‘ASIO Control Panel…’. Restart of DS WASAPI ASIO Router Mixer might be needed after changing the setting. If your computer’s CPU has power saving functionality (the CPU is throtled when idle) adjust the CPU power saving option in Windows control panel to 50% or higher if the output is still skipping. A little CPU time can be saved with middle mouse button clicking on the input/output peak value number. This disables the peak calculation process. The fastest CPU (as of April 2019) is the Intel Core i9-9900K @ 3.60GHz for the application. For ASIO output, if multi-threaded processing is enabled in settings, a CPU with more cores is more optimal, this functionality is experimental and only has advantage if there are a lot of ASIO channels with a lot of effects like VST DSPs on the channels.
VST DSP: to bring up the plugin’s configuration window double click on the plugin’s name. To reset it’s settings right mouse click on the plugin’s name and from the menu select ‘Reset Plugin To Defaults (disable)’.
It is advised to always work in 32 bit float sample format mode when dealing with input and output channels/devices. Recording may be set to any desired format, the sample data will be converted to the set format for recording.
ASIO root device recording: It’s possible to record ASIO root devices with option to only record the enabled stereo channel pairs. For ‘channels’ select ‘Active pairs’, only active channels pair will be recorded. For example if ASIO pair 1/2 and 5/6 is enabled the recording will contain 4 channels: 1/2 and 5/6. Note that multi-channel recording is only supported by WAV PCM, Opus, FLAC and Ogg Vorbis format.
Whats New:
Updates: official site does not provide any info about changes in this version


